⏳ This skill is pending AI review.
Scores will appear once the review pipeline completes.
blender-pipeline
Extract a tutorial or reconstruct a Blender result from video links, local videos with supporting assets, or Markdown tutorials in Codex chat. Clarify the intended output when unspecified; also route explicit showcase reproduction and independent asset edits.
Choose how to use this skill
You do not need every option. Choose the path your AI client supports. The stable page stays the same; versioned files are immutable.
1. Native installer
This listing has no registered native installer command. Use the complete package or source fallback below, depending on what your client supports.
Do not guess an installer command or replace an existing version without reviewing the diff.
2. Complete package recommended
Download the ZIP when available. It includes SKILL.md plus the references, security notes and version metadata.
No complete ProSkills package is published for this listing yet.3. Prompt-only
Copy the prompt above when the agent can read the stable page or when you want to adopt the workflow without installing a skill.
Need only the instruction file?
Download SKILL.md only if your client requires a single file. The complete ZIP is safer for a full installation because it preserves the references and release context.
No path installs or executes anything by itself. Your agent still needs access to the project files. Before updating, compare the installed version and review the diff.
// RATINGS
// README
English | 简体中文
🔭 Overview
Internet Blender tutorials contain rich, real-world creation knowledge, but that knowledge is difficult for an agent to use directly. Important instructions may appear in narration, on-screen captions, changing interface states, or brief node-graph operations. BlenderLore converts tutorial videos into timestamped multimodal evidence, reconstructs the demonstrated workflow, and generates executable Blender Python. Each run delivers an editable Blender project, a reproduction script, renders, and validation results.
Generalization is central to BlenderLore. Successful reconstructions are retained as candidate procedural knowledge. When facing an unfamiliar generation or editing task, the agent decomposes the target into reusable construction patterns, retrieves relevant procedural knowledge, and recombines it into task-specific Blender code.
🧩 Method
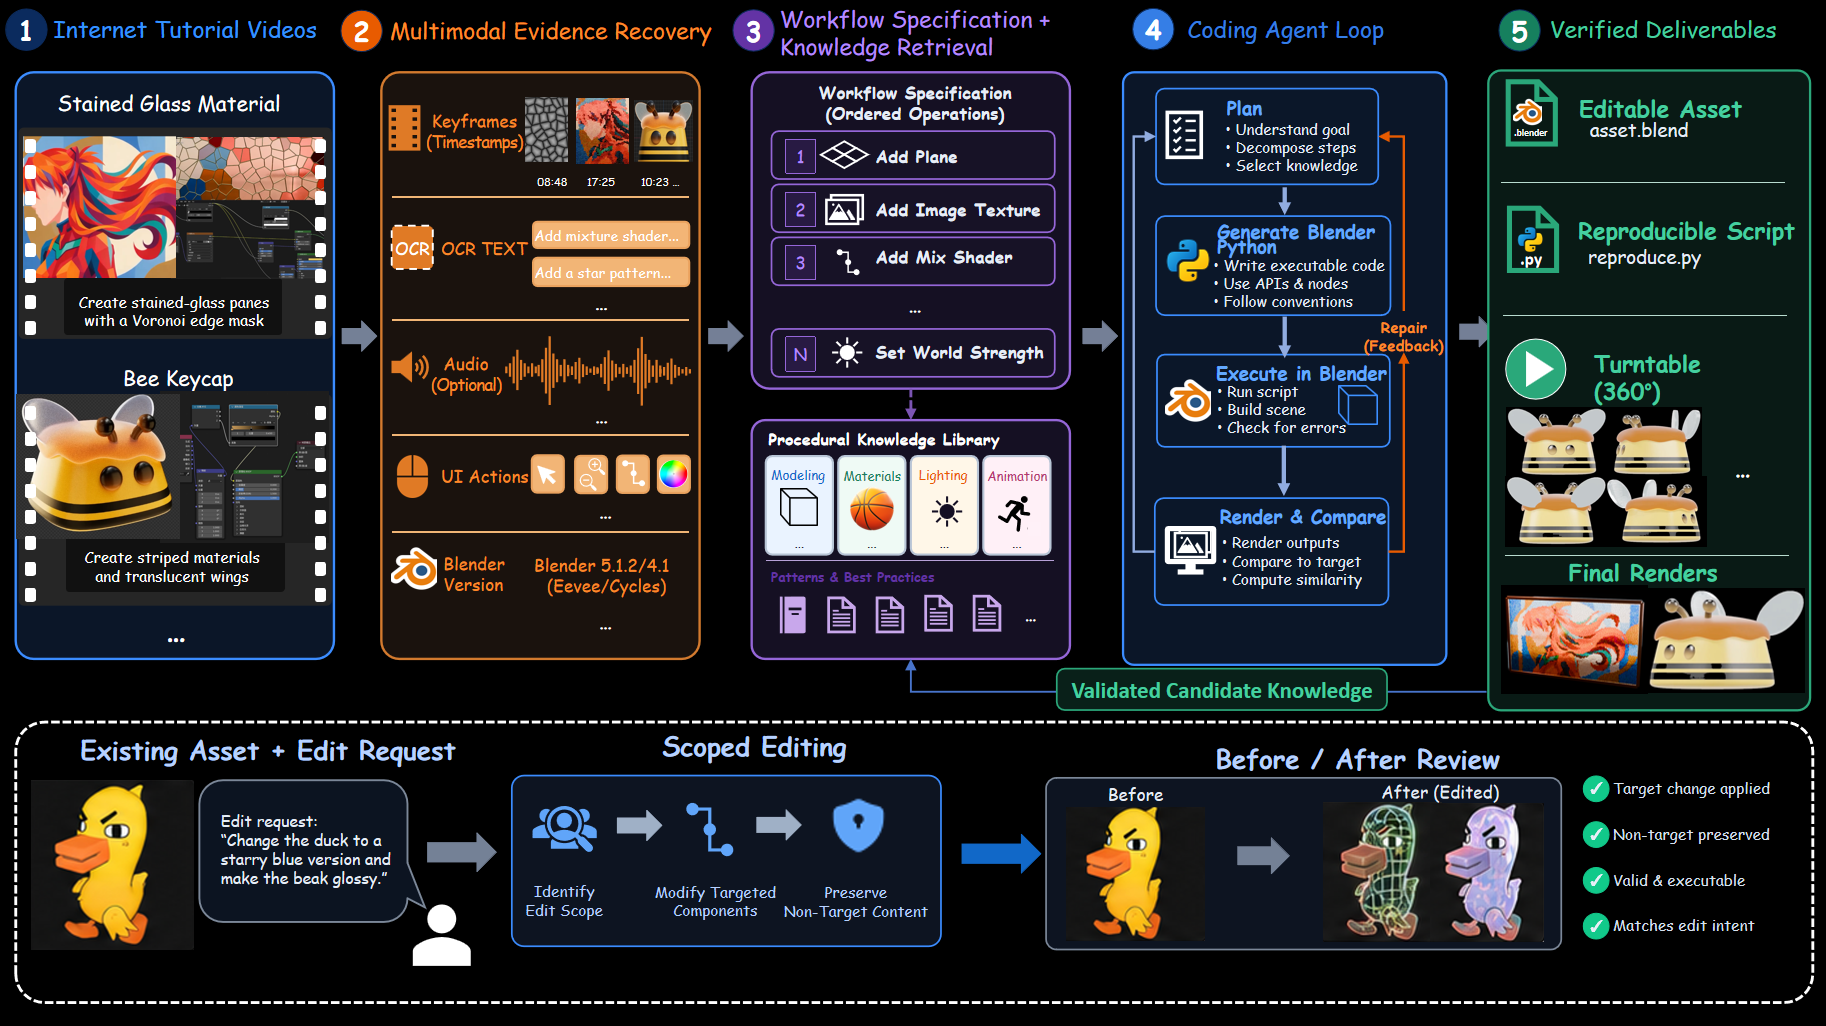
- Collect tutorials — select a high-quality Blender tutorial and define the target asset or supported motion.
- Recover evidence — align visual keyframes, OCR, narration, timestamps, interface actions, and Blender-version cues.
- Specify the workflow — convert the evidence into ordered operations and retrieve relevant procedural knowledge.
- Code, run, and repair — generate Blender Python, execute it, render the scene, compare the result, and repair failures.
- Verify and retain — package editable assets and visual evidence, then retain validated patterns for future tasks.
🎁 What You Get
01 · An End-to-End Agent Pipeline
Each run recreates a tutorial workflow and delivers an editable Blender project, a reproduction script, renders, and validation results.
- Editable Asset —
asset.blend - Reproduction Script —
reproduce.py - Materials & Node Graphs
- Final Render
- Multi-View Renders
- Animation
- Agent Log
02 · A High-Quality 3D Dataset
Through collection, repair, and reconstruction, we built a high-quality dataset of 23K procedural 3D assets.
03 · A Reusable Procedural Knowledge Library
Successful workflows are retained as reusable procedural knowledge. For unfamiliar targets, the agent decomposes the task, retrieves relevant patterns, and recombines them into task-specific Blender code.
🚀 Quick Start
1. Install prerequisites
Install Python 3.10+, Blender, and FFmpeg (including ffprobe), with Blender and FFmpeg on PATH. Commands below target macOS/Linux; on Windows, use Linux Python and Blender in WSL. Replace example paths with your own.
git clone https://github.com/FreedomIntelligence/BlenderLore.git
cd BlenderLore
python3 -m venv .venv
source .venv/bin/activate
python -m pip install -r requirements.txt
For Codex, install and sign in to Codex CLI using the official documentation, and ensure the client can run codex.
2. Install Skills
Run from the repository root to install the Skill into the current user's Codex environment:
mkdir -p "$HOME/.agents/skills"
ln -s "$PWD/skills/blender-pipeline" "$HOME/.agents/skills/blender-pipeline"
3. Configure rendering
Cycles uses the CPU by default. Omit the Blender path setting if Blender is already on PATH.
export BLENDER_PIPELINE_BLENDER=/path/to/blender
export VIDEO2BLENDER_CYCLES_BACKEND=CPU
For GPU rendering, replace CPU with the appropriate backend: OPTIX or CUDA for NVIDIA, METAL for Apple Silicon, HIP for AMD, or ONEAPI for Intel.
4. Configure inputs and outputs
Keep input files on your computer. For API mode, enter their paths in the terminal launch command in step 5; for Codex, provide paths or links directly in the client's chat composer.
| Input | API argument | Provide in Codex |
|---|---|---|
| Local video | --video-file | Absolute path to the video |
| Video URL | --video-url | Full HTTPS video URL |
| Markdown tutorial | --tutorial | Absolute path to the .md file |
Markdown tutorials need numbered operations and their referenced images. Text-only tutorials also require a final reference image.
Choose a new or empty output directory outside the repository: use --output-dir in API mode, or specify it in the Codex conversation. Output formats are fixed; main files appear as their corresponding stages complete:
run_001/
  tutorial.md             # Illustrated tutorial
  reproduce.py            # Blender Python code
  asset.blend             # Editable project
  render.png              # Rendered image
  six_views/              # Static multi-view renders, when applicable
  final_effect.mp4        # Animation or turntable video, when applicable
  pipeline_review.json    # Review results
5. Start with API / Codex
API
Open a terminal at the repository root and run this command for first-time setup:
python run_api.py --configure --config "$HOME/.config/blender-pipeline/pipeline.json"
At the terminal prompts, enter an HTTPS API endpoint ending in /chat/completions and your API key. The endpoint is saved in the endpoint field of ~/.config/blender-pipeline/pipeline.json; the key is saved in model_api_key in the same directory. Edit these files to change the configuration later.
Launch from the same terminal, replacing the input path and output directory with your own. Use the corresponding argument from step 4 for other input types:
python run_api.py --config "$HOME/.config/blender-pipeline/pipeline.json" \
  --video-file /path/to/input/tutorial.mp4 --output-dir /path/to/data/run_api
For a tutorial with a starting project, append --asset /path/to/starter.blend; for a text-only tutorial, append --target-image /path/to/target.png.
Codex
Type /blender-pipeline in the chat composer:
/blender-pipeline
Input: /path/to/input/tutorial.mp4
Output: /path/to/data/run_skill
You can replace the input with a full video URL or a Markdown tutorial path. Include paths to any supporting project or reference images in the same message.
📖 Citation
@misc{blenderlore2026,
  title        = {BlenderLore: Learning 3D Coding from Internet Tutorial Videos},
  author       = {FreedomAI Team},
  year         = {2026},
  publisher    = {GitHub},
  journal      = {GitHub repository},
  howpublished = {�rl{https://github.com/FreedomIntelligence/BlenderLore}},
}
🙏 Acknowledgements
This project is built upon Blender, the free and open-source 3D creation suite.
📄 License
This project is released under the Apache 2.0 license.
📬 Contact
For questions and feedback, please contact us at: [email protected]
// HOW IT'S BUILT
KEY FILES